Applies to platform: UTM 2.5, Edge 2.5
Updated on: 4th of December 2015
Note
This lesson will illustrate the necessary steps to configure Active Directory integration with OpenVPN. Using this, you can now authenticate VPN users using just their Active Directory username and password and not have to (necessarily) create additional VPN-only accounts on the Endian.
Warning
Backup Original Configuration File
root@endian~#: cp /var/efw/openvpn/settings /var/efw/openvpn/settings.backup
Before you begin modifying anything, it's always wise to backup any files you'll be changing in case you make a mistake or wish to revert back to your original settings. From the CLI, use the command shown above to create a backup file before you begin.
Add Active Directory Authentication Settings
root@endian~#: nano /var/efw/openvpn/settings
The step shown above will open the text editor application on the Endian so you can add the lines directly (see here or here for an introduction on using this text editor). Now using the text editor from the CLI, you will edit the file and add the lines shown in the next steps but substituting your own Active Directory environment settings for the ones shown in this example.
Configuration Edit #1 - Authentication Order
AUTHENTICATION_STACK=ldap,local
This line defines which authentication modules OpenVPN should use and in which order they should be processed. In this case, we're specifying LDAP (Active Directory) and then local VPN users.
Configuration Edit #2 - Server URI (IP Address)
LDAP_URI=ldap://192.168.5.25
This line tells OpenVPN where to find the Active Directory server by using the IP Address.
The format of this field is: protocol://host[:port]
Configuration Edit #3 - Bind Information
LDAP_BIND_DN=cn=Administrator,cn=Users,dc=corp,dc=example,dc=com LDAP_BIND_PASSWORD=password
If you're Active Directory server does not allow anonymous binding, then you'll need to configure an distinguished name (DN) of an AD account to use that can query the required user tree(s). Normally it's recommended to use the 'Administrator' (or equivalent) account as this works best for the majority of deployment scenarios.
Configuration Edit #4 - User Base DN information
LDAP_USER_BASEDN=cn=Users,dc=corp,dc=example,dc=com
Here you can specify the tree in the Active Directory server where the users you wish to authenticate are located. Obviously, you're search string will vary depending on how your AD tree is setup.
Configuration Edit #5 - User Search Filter
LDAP_USER_SEARCHFILTER=(&(objectCategory=person)(objectClass=user)(sAMAccountName=%(u)s))
Here you'll specify the search filter to use in locating the users to be authenticated and then pass the username and password (in the query).
Save the File and Exit
root@endian~#: cat /var/efw/openvpn/settings
AUTHENTICATION_STACK=ldap,local
AUTH_TYPE=psk
DOMAIN=localdomain
DROP_DHCP=
LDAP_BIND_DN=cn=Administrator,cn=Users,dc=corp,dc=example,dc=com
LDAP_BIND_PASSWORD=password LDAP_URI=ldap://192.168.5.25
LDAP_USER_BASEDN=cn=Users,dc=corp,dc=example,dc=com
LDAP_USER_SEARCHFILTER=(&(objectCategory=person)(objectClass=user)(sAMAccountName=%(u)s))
OPENVPN_ENABLED=on
PORT=1194 PROTOCOL=udp
PURPLE_DEVICE=tap0
PURPLE_IP_BEGIN=192.168.5.90
PURPLE_IP_END=192.168.5.95
PURPLE_NET=10.100.5.0/24
PUSH_DOMAIN=
PUSH_GLOBAL_DNS=
PUSH_GLOBAL_NETWORKS=
Once you've added all of the configuration lines above into the settings file, you can now save and exit the program by hitting CTRL-X and typing 'Y" at the prompt to save the file. You're finished /var/efw/openvpn/settings file should resemble the one shown above (with your own settings of course).
Restart VPN Server

You must restart the VPN server in order for the new changes to take effect.
You can do so from the web interface by going to VPN and then select Save and Restart.
Test VPN User Account
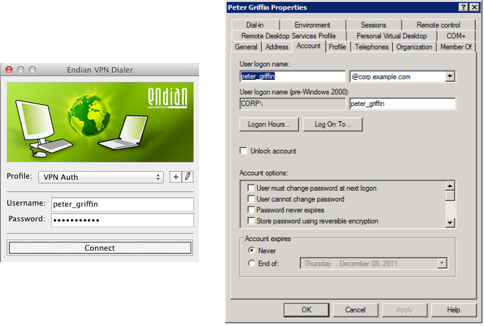
You should now be able to test any user account that matches the settings you configured in the AD configuration.
Remember, the username will be the actual "User logon name" as defined on your Active Directory server (which could be different from the descriptive name given to the account)
Commenti