Applies to platform: All
Last updated: 4th July 2012
This lesson shows you how to edit Endian's configuration, which consists of text files, using the pre-installed nano editor.
You need to access your Endian UTM Appliance via SSH or serial console to be able to use nano. We use the /var/efw/ethernet/settings file as example file that you want to modify. You can find some useful command that can be used on Endian's shell (console) here.
Before editing a file
Whenever you edit an existing file, especially if this is a configuration file or another system-critical file (like files under the /etc directrory), best practices suggest that you make a backup copy of it, to be able to roll back to the previous situation if anything should go wrong. To make a backup copy of a file, use the cp command, like:
root@endian:~# cp /var/efw/ethernet/settings /var/efw/ethernet/settings.BAKin which the first file is the file to be copied and the second is the backup copy. To copy the old file on the new one, simply swap the two filenames
You can now edit and modify the file, launching the nano editor:
root@endian:~# nano /var/efw/ethernet/settings

Editing a file
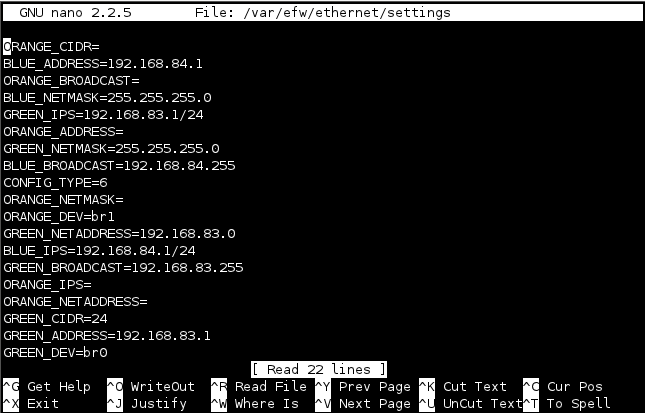
On the bottom of the screen, you see the most common operations you can do on the buffer. The ^ symbol before a letter means that you should press the CTRL key together with the letter, so by ^G it is intended that both CRTL and G keys (lowercase or uppercase) must be pressed together. This is called key sequence. You can also find as shourtcut like M-D, which refers to the key sequence META+D, where the META key is Esc.
You can write text in nano like in any other editor (e.g., notepad under Windows). To avoid misunderstanding, we use the following terminology:
- file is the file currently edited (in the above image /var/efw/ethernet/settings)
- buffer is the content of the file (which is composed by 22 lines)
- screen is the text that is visible at once within the editor's interface (the 19 lines that can bee seen, from ORANGE_CIDR to GREEN_DEV=br0)
- action is any operation that you want to do on the buffer (e.g., insert a file, save the current buffer, search for a string)
- function key is another name for key sequence.
The most common actions that you can do on the text are the following. It is intended, that all operation that are done on the text (e.g., search of strings, insertion of external files, deletion of text, and so forth) are relative to the point where the cursor is located.
- ^G: access the help system. It is perhaps the most important nano's key sequence and it is context-aware, meaning that it only shows the help relative to the current situation and actions.
- ^X: exit the editor. If the file has unsaved modifications, you will be asked to save the file.
- ^O: write the file immediately on disk
- ^J: justify the current paraghraph
- ^R: insert the content of a file
- ^W: search for a string within the text
- ^Y, ^V: move upwards and downwards a screen.
- ^K: delete a whole line
- ^U: paste the whole text that has been last deleted with ^K. If more lines were deleted in a row, all of them will be pasted
- ^C: return the current cursor position (line, column, and character)
The help system
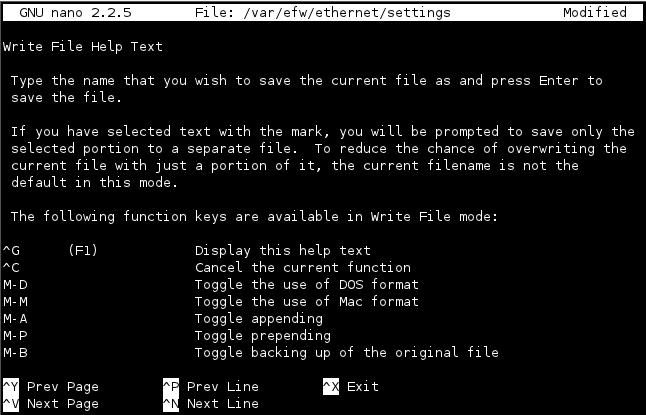
Nano's help system is very efficient, and, as mentioned above, context-aware. Hence, whenever you invoke it, it shows the name and description of the current action, along with the available function keys and desctiption all the possible option for that action, like in this screenshot:

When you invoke the help from the editing mode,
Saving a file
After you have modified the file at your will, there are two possibilities to save it, by either pressing CTRL+O or CTRL+X, the only difference being that the first one lets you continue with the editing, while the latter exits immediately after the file has been saved.
The menu at the bottom will change and you will be prompted to give a name to the file (only useful if you want to change the name):

The availble options are described in the screenshot in the previous section, The help system. Additional information on the nano official documentation.
Commenti