Applies to Platform: UTM 2.4, UTM 2.5
Last Update: 28 April 2011
Note
This lesson will illustrate the necessary steps to configure a more advanced web proxy with Microsoft Active Directory (NTLM) integration on a typical Endian appliance. Using this form of the web proxy, we can use already existing Active Directory groups and users to create filtering profiles for different levels of web access.
Note
Configuration Example
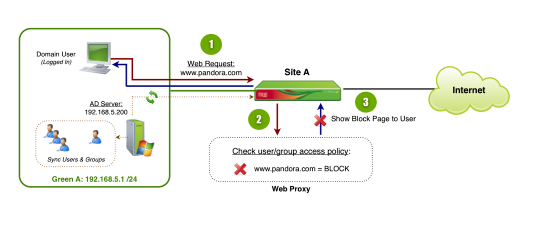
The diagram above illustrates some of the basic steps involved with web proxy authentication (specificially Active Directory). In our specific example, we'll use two AD groups (admin and general users) to define differing levels of filtering with a more restrictive policy for general users.
Enable the Web Proxy
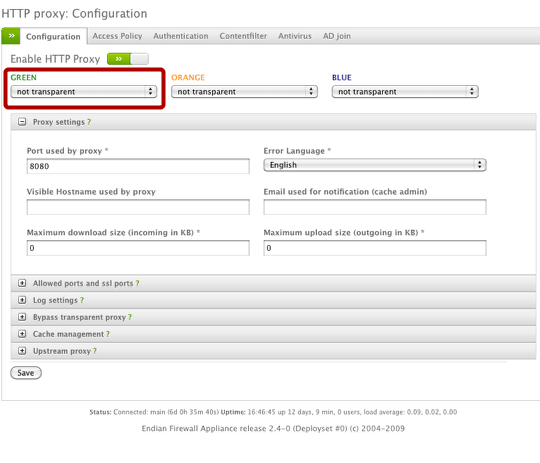
The first step is to enable the web proxy by clicking the gray button (which will turn green when enabled). We'll set the operational mode for each network we want filtered to be "non-transparent".
Warning
Configure the Log Settings

Since we want to have all web access (allowed and blocked) logged for review purposes, we're going to enable the appropriate logging options.
Click Save and then Apply the changes to proceed.
Configure the Content Filter Profile #1 (General Users)
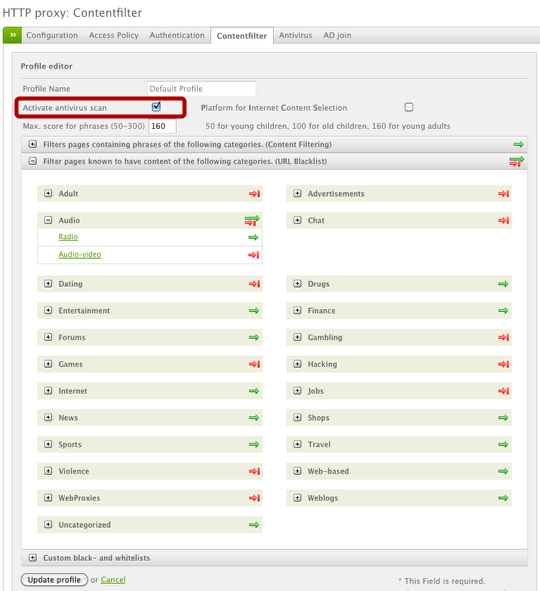
The first profile we'll build will be for our general users group which will be more restrictive in terms of web access. In this example, we're only going to configure web filtering by URL Blacklist (only) for ease and administration purposes. The first thing we'll do is ensure our HTTP antivirus is enabled by checking the appropriate box. You can select the whole category to block by clicking the green arrow or, alternatively, you can drop down the subcategories and select those individually in order to block some and not others. You can also attach custom white- or blacklists to this profile as well.
Click Update Profile and then Apply the changes to proceed.
Configure the Content Filter Profile #2 (Admin Users)
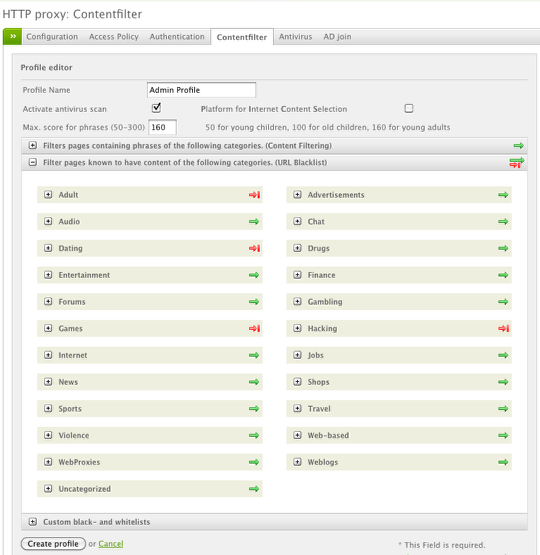
The next profile is for the admin group and will be less restrictive for web access. Again we're only using the URL blacklist for simplicity but you can use the other forms of filtering as well.
Note
Configure Proxy Authentication
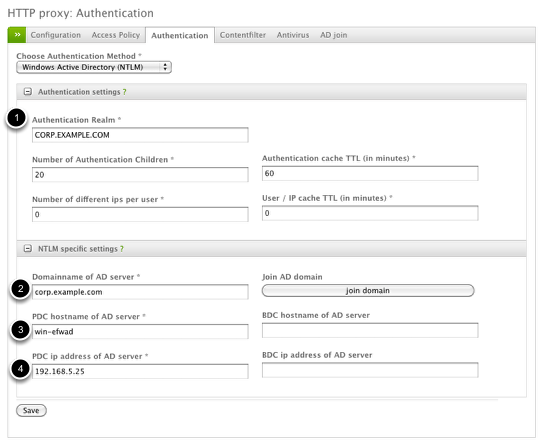
The next step is to configure the authentication piece of the web proxy which requires joining the Endian appliance to your Active Directory server. The key pieces of information are the (1) Authentication Realm which is just the domain, (2) the Domain name, (3) the PDC hostname of the AD server and (4) the PDC IP address. The BDC information is not required so you can leave this section blank.
Click Save and then Apply the changes to proceed.
Note
Join the Endian to the AD Server
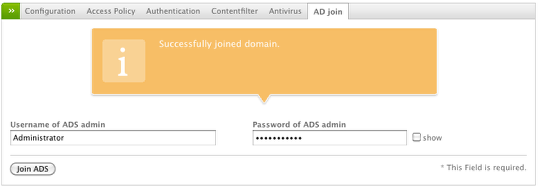
Now we can join the domain by providing a Domain Administrative user name and password (one with permissions to perform domain joins).
Once that's done, click Join ADS and you should see a successful message (illustrated above).
Configure the Access Policy (General Users)
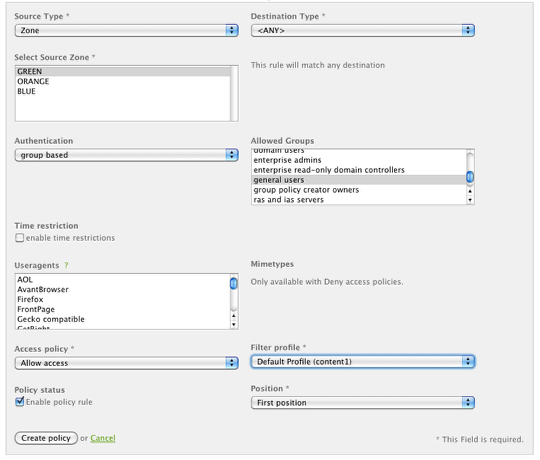
The last step is to create an access policy which will map the content filtering profile based on a specific network configuration. In the example above, we're creating a policy for the Green zone (entire network) for any user in the "general users" group that uses the content filtering profile #1 (default).
Click Create Policy.
Configure the Access Policy (Admin Users)
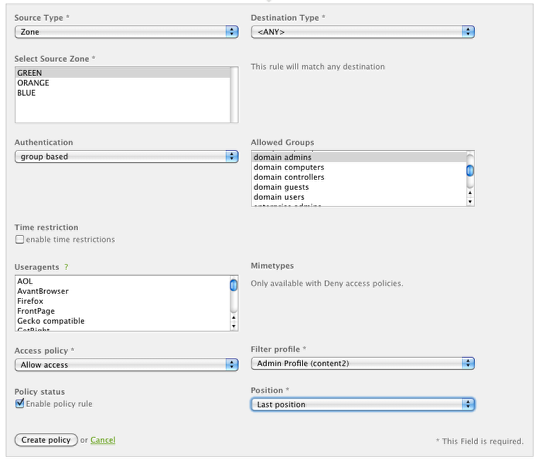
Now we'll configure a separate access policy to map any Green network user belonging to the "domain admin" group to use the content filtering profile #2 (admin).
Click Create Policy and then Apply the changes.
Setup Client-Side Configuration
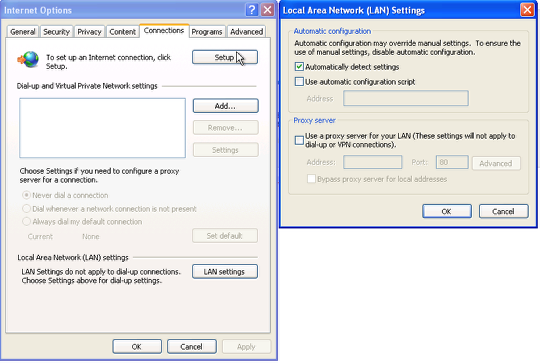
The easiest solution is to use the Endian web proxy with authentication in a semi-transparent fashion is to have the Endian also handle DHCP for those networks you wish to provide the web proxy. Using this method, all of the necessary DHCP parameters are automatically configured and handed out to Endian client workstations so they detect and use the proxy automatically assuming the above configuration for Internet Explorer is set. This setting "Automatically detect settings" must be enabled (which it is by default) in order for the IE browser to automatically find the proxy without any further manual configuraiton (PAC file).
The IE browser setting can generally be found under Tools > Internet Options > Connections tab > LAN Settings
Test the Web Proxy
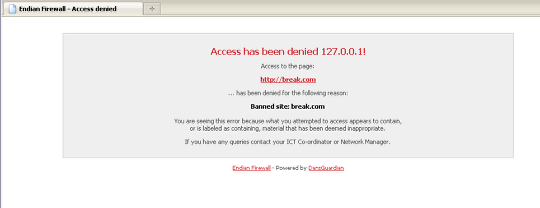
You can test your configuration now by browsing the Internet from the Green network and testing different user logins (admin and general user) to verify the appropriate content filtering profiles are being applied.
Verify Logging

You should also be able to view all the web traffic in real-time by going to Logs > Live Log Viewer and select the "Web Proxy" log to view. You'll notice in both the live log viewer and regular proxy logs (pictured above) that you can identify the username for individual traffic which can help you in monitoring users web behavior.
Commenti