Applies to Platform: UTM 2.4, UTM 2.5, 4i Edge 2.5
Last Update: 04 of October 2012
This lesson will illustrate the necessary steps to configure a very simple Net-to-Net SSL VPN (OpenVPN) tunnel between two Endian appliances using TCP protocol. This will allow the Endian client gateway to easily and transparently run behind an existing customer firewall over a standard open TCP port (e.g. port 80).
Configuration Example
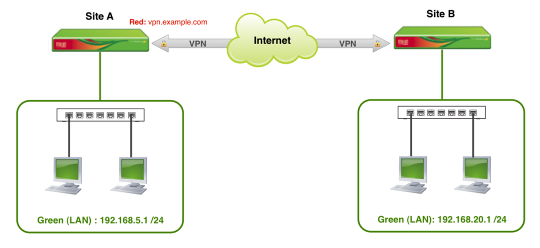
The diagram above is a simple illustration of the configuration example covered in this guide. We'll be creating a Net-to-Net connection to allow communication between the two internal Green (LAN) networks of each Endian device.
Enable the VPN Server (Site A)
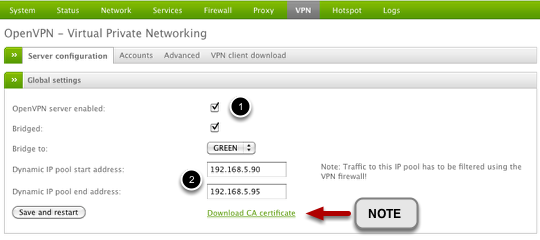
From the Endian main menu, select VPN and immediately you will be taken to the SSL VPN (OpenVPN) server configuration page. The first thing to do is to ensure the OpenVPN server is enabled by checking the first box (1).
The next step is to choose whether you want the OpenVPN server to run in bridged mode (i.e. included in the interface bridge) or you want it to run in non-bridged mode with a separate, unique VPN IP pool. The default is to run in bridged mode (2) to the Green zone and this is recommended for most common VPN deployments. If you choose to run in bridged mode (as we are), you may also specify which network zone you want to be bridged to the VPN interface.
The last thing is to set aside a range of IP's within the bridged interface network to be used exclusively by the VPN server (2). Keep in mind that these IP's shouldn't be allocated anywhere else on the Endian device (e.g. DHCP range, Static IP's , etc.). Once you're done, you can click Save and restart to enable the VPN server.
Note
Configure the VPN Server Settings
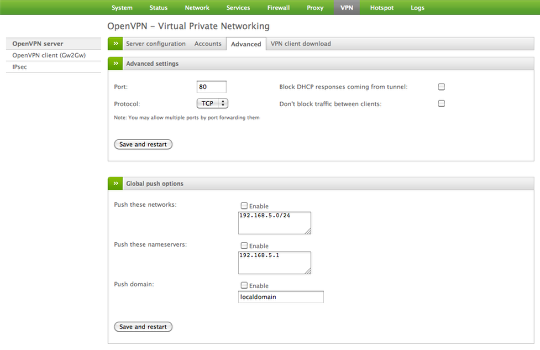
Under the Settings (VPN Server > Advanced) we will change the Port to 80 and Protocol to TCP.
Create the VPN Account (Site A)
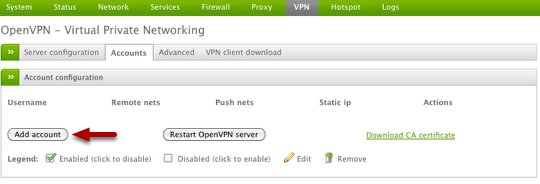
Select Accounts from the VPN Server Menu and then select Add account button to create a new VPN account
Create the VPN Account Details (Site A)
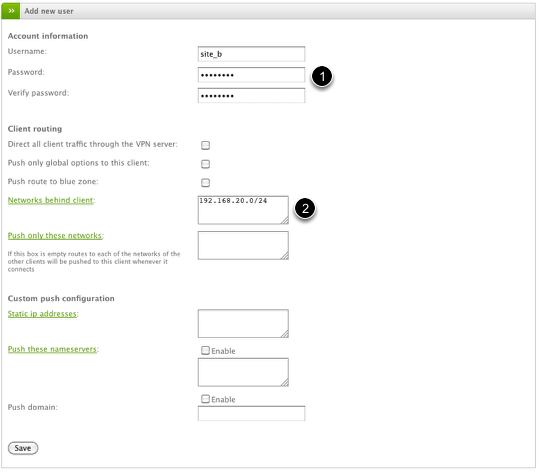
The main things to configure for the new Net-to-Net VPN account are the Username and Password (1) and the Networks behind client (2) which identifies the remote VPN network (Site B) that you will be connecting to this VPN server. This field (2) must be in the format of Network/CIDR (as illustrated) and can accept multiple entries one per line.
Once you've completed the necessary fields, click Save to proceed.
Setup the VPN Client Device (Site B)

On the client device, from the Endian main menu select VPN > OpenVPN client (Gw2Gw). Once there you will click the Add tunnel configuration button to begin the creation of the client VPN account.
Configure the VPN Account (Site B)
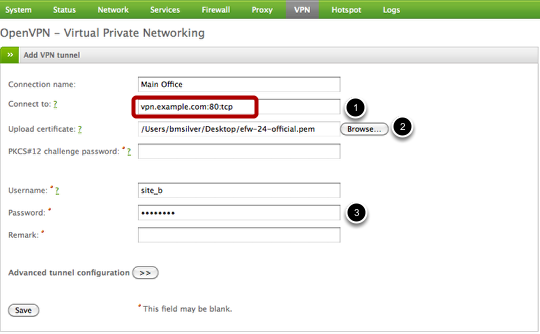
Now we can configure the setting for the VPN client device. The first field, Connection name, is just a generic string to describe this VPN connection. The next field, Connect to (1), is where you will provide the IP address or DNS hostname (vpn.example.com), port number, and protocol of the Endian VPN server (format = <hostname / ip>:<port>:<protocol>). Next you need to upload your server certificate (2) that you had downloaded from the VPN server in the first step. Last, you must provide the Username and Password (3) of this VPN account you previously configured.
Since we're setting up a simple connection, we'll leave the Advanced tunnel configuration options as default.
Once you've completed the necessary fields, click Save to proceed and initiate the client VPN connection.
Verify Connection (Site A)
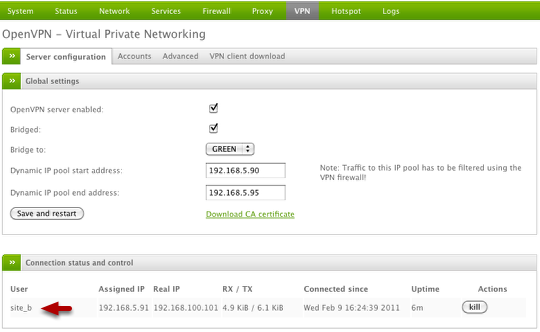
If all goes well, we should see the Site B remote device show up on Site A under the Connection status and control section of our VPN server. Once the user is connection you can view relevant VPN user information from this screen as well.
Verify Connection (Site B)

Now we can also verify the client side is connected by confirming the Status changed to "established" which indicates a successful VPN connection.
Test Internal Connectivity
Now you should be able to successfully test all internal access to remote devices (resources) from both sides of the VPN tunnel. Anything from a simple ICMP ping to an RDP session or remote web server should be accessible across the tunnel.
Commenti