Applies to Platform: UTM 2.4, UTM 2.5, 4i Edge 2.5
Updated on: 8th of May 2014
Applies to Platform: UTM 3.0, UTM 5.0, 4i Edge 3.0, 4i Edge 5.0
Updated on: 19th of Mar 2018
This lesson guides you in the configuration of your Endian Appliance for splitting a Zone (e.g., the GREEN Zone) with more than one interface in multiple sub-zones with different subnets.
Ususally, Endian Appliances put in a bridge all the interfaces within the same zone - this happens with virtual interfaces (VLAN) as well.
For example br0 (GREEN) may contain eth0, eth1 and those devices you chose as belonging to the GREEN zone.
For many reasons you may want to split a zone in additional sub-zones that do not communicate with each other, but due to the structural limits, you can't remove an interface from a bridge. Fortunately there is a workaround that could mitigate this problem.
Requirements
- Two or more interfaces (could be also VLAN) to the same zone (ex. GREEN Zone)
- Two or more subnets configured to the same zone (ex. 10.0.1.0/24 and 10.0.2.0/24 for GREEN Zone)
We will assign the subnet 10.0.1.0/24 to the Interface 1 (eth0) and the subnet 10.0.2.0/24 to the Interface 2 (eth1)
To fulfil the requirements you can use the Network Configuration Wizard. More information in this lesson.
Note
Isolate Two Interface in The Same Zone
The first step is the creation of the Inter-Zone rules necessary to isolate the interfaces at Layer 2. We can to do this from the GUI, so go to Menubar > Firewall > Inter-Zone traffic and click on Add a new inter-zone firewall rule.
- Select the source type, in this case Zone/Interface.
- Select the source Interface of the GREEN Zone, in this case Interface 1 (Zone: GREEN).
- Select the destination type, in this case Zone/Interface
- Select the destination Interface of the GREEN Zone, in this case Interface 2 (Zone: GREEN)
- Select the protocol ETHER (Note: This is mandatory: Otherwise, the traffic will not be blocked at Layer 2 and you might experience issues with the Spanning Tree Protocol)
- In the Policy tab select action DENY
- Select the rule position, the rule must be before the allowing rule GREEN to GREEN so select Position: First
- Optional: Add a remark for the rule (ex. isolate traffic from Interface 1 to Interface 2)
- Edit the rule GREEN to GREEN, you can edit this rule by click on the pencil then in the Policy tab select action DENY
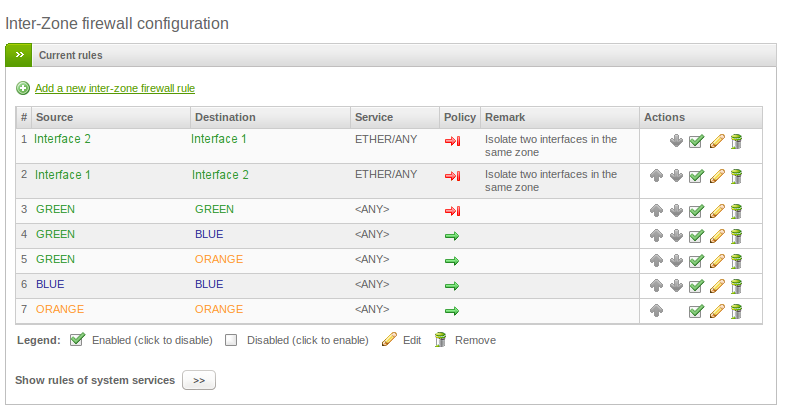
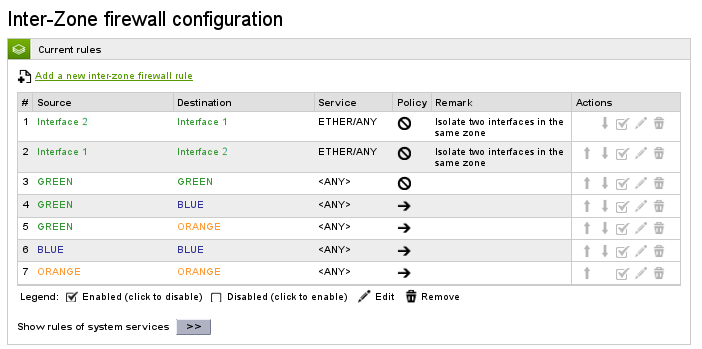
In the above example we created two blocking rules and modified from allow to block the default policy between GREEN and GREEN.
The first rule blocks Layer 2 traffic from Interface 1 to Interface 2, while the second one from Interface 2 to Interface 1.
Note
Bind an IP Address or Subnet to the Interface
In the previous section we have isolated the communication between the interfaces but this is not sufficient because for example a client behind the Interface 1 could use the Internet with an IP from the subnet 10.0.2.0/24, while we want to use this subnet only for clients behind the Interface 2. So the idea is to use the custom rules for blocking all the traffic which is not designated to the specific interface and allow only all the traffic designated.
To create the custom rules we need to use the inithooks file rc.firewall.local. For more info on inithooks or if the file rc.firewall.local doesn't exist on your system, please refer to this article.
Now proceed by editing the /var/efw/inithooks/rc.firewall.local file with the editor nano.
root@endian:~ # nano /var/efw/inithooks/rc.firewall.local
In the start section of the file, you should place four iptables rules. In the sample rc.firewall.local file below we have two rules per interface. In the first Interface1 section, the first rule allows the traffic if the source of the traffic comes from the subnet 10.0.1.0/24 and from the Interface 1 (eth0), while the second rule blocks the traffic not destinated to this interface. In the second Interface1 section, similar rules filter the incoming traffic. In the two Interface2 sections, symmetric rules are built to govern the traffic in the opposite direction as in the Interface1 sections.
#!/bin/bash
# See how we were called.
case "$1" in
start)
## add your 'start' rules here
# Rules to bind a subnet to an interface/vlan

# Interface1
        iptables -A CUSTOMFORWARD -s 10.0.1.0/24 -m physdev --physdev-in eth0 -d 0/0 -j RETURN
        iptables -A CUSTOMFORWARD -s  0/0 -m physdev --physdev-in eth0  -d 0/0  -j DROP
# Interface2
        iptables -A CUSTOMFORWARD -s 10.0.2.0/24 -m physdev --physdev-in eth1 -d 0/0 -j RETURN
        iptables -A CUSTOMFORWARD -s  0/0 -m physdev --physdev-in eth1  -d 0/0  -j DROP

# Add rules to forbid traffic destinated to the firewall (proxies, management, ecc)

# Interface1
        iptables -A CUSTOMINPUT -s 10.0.1.0/24 -m physdev --physdev-in eth0 -d 0/0 -j RETURN
        iptables -A CUSTOMINPUT -s  0/0 -m physdev --physdev-in eth0  -d 0/0  -j DROP
# Interface2
        iptables -A CUSTOMINPUT -s 10.0.2.0/24 -m physdev --physdev-in eth1 -d 0/0 -j RETURN
        iptables -A CUSTOMINPUT -s  0/0 -m physdev --physdev-in eth1  -d 0/0  -j DROP
;;
stop)
## add your 'stop' rules here
# Flushes custom chains
        iptables -F CUSTOMFORWARD
        iptables -F CUSTOMINPUT
;;
reload)
## add your 'reload' rules here
;;
*)
echo "Usage: $0 {start|reload|stop}"
esac
After that, you have to be sure to apply the correct permissions to the file:
root@endian:~ # chmod 755 /var/efw/inithooks/rc.firewall.local
Limits of This Solution
This procedure is still a workaround and therefore there are some constraints:
- There are no explicit references to sub-zones on the GUI, you always have to refer to an Interface or IPs in a subnet.
- DHCP server can't be used to assign different IPs for different sub-zones (Although there are some hacks but don't cover all the possibilities).
- Further changes in interfaces or IPs need to be reflected also with custom iptables rules in the rc.firewall.local file.
- Such configuration is not supported with HA, as inithooks firewall rules are not replicated on Slave appliance during failover.
Comments