Applies to Platform: Windows
Updated on: 15th of July 2015
This lesson will illustrate the necessary steps to configure a certificate-based roadwarrior IPSec VPN tunnel between a remote user's computer and an Endian device using the freely available Shrewsoft IPSec VPN client software for Microsoft Windows. The use of certificates is recommended for roadwarrior access as there are limitations with using pre-shared keys -- mainly that only 1 roadwarrior account with PSK is possible (this is, for the most part, a limitation of IPSec across the industry).
Configuration Example
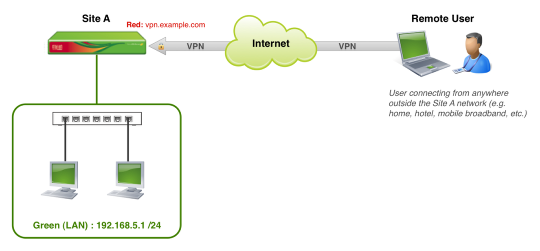
The diagram above is a simple illustration of the configuration example covered in this guide. We'll be creating a remote user (roadwarrior) connection to allow communication between any external remote computer and the internal Site A Green network. This will allow the user to act as though they were locally (direct) connected to the Green network of the Site A Endian device and access the same internal resources.
Enable the VPN Server (Site A)

From the main menu, select VPN > IPSec and then check the box to enable the VPN server.
Click Save to continue.
Generate IPSec Certificates
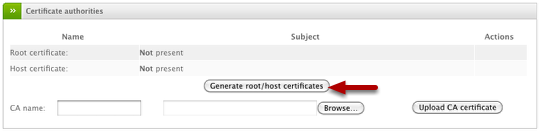
Under Certificate Authorities section, click Generate root/host certificates button to begin the process.
Create IPSec Certificates
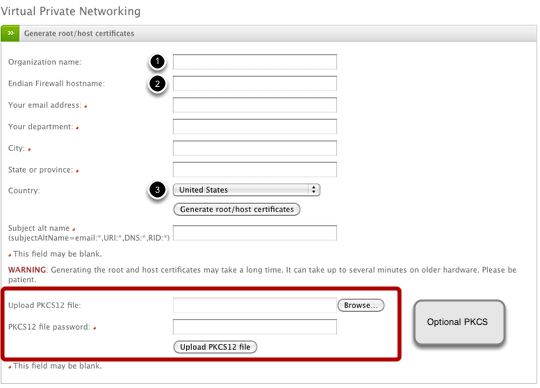
Now we'll populate the fields required to generate the certificates. Note the only actual required fields are the (1) Organization name, (2) Endian hostname, and (3) Country though it's recommended to complete as many field as possible.
OPTIONAL:
If you already have a PKCS certificate file that you would prefer to use instead of generating your own, you may upload them using the bottom section of the form.
Once you're done completing the form, click Generate root/host certificates to complete the process (this may take a few minutes).
Add a VPN Connection

Under VPN > IPSec and the "Connection status and control" box, click the Add button to create a new connection.
Configure VPN Connection Type
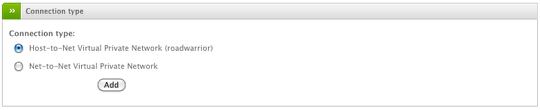
In the next screen, select Net-to-Net and click Add to continue.
Configure VPN Account (Part 1 of 2)

The first step is to configure the VPN account by providing the (1) Name, (2) External Interface to use for listening for incoming VPN connection, and (3) a uniqure Remote ID which in our case we're providing a fully-qualified domain name (FQDN) which we'll use when configuring the client software.
Configure VPN Account (Part 2 of 2)
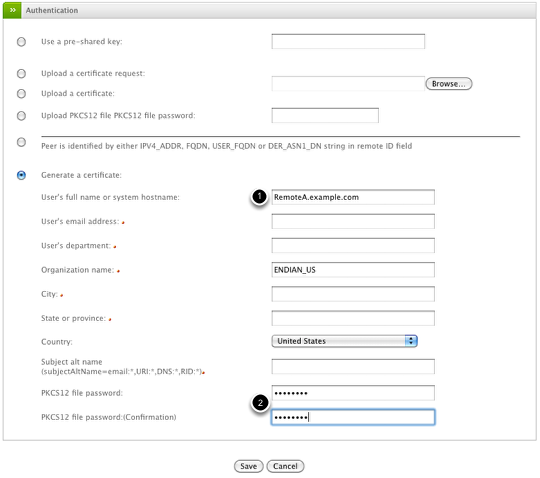
The second part of the VPN account creation requires creating a host certificate specific to this user account. Under Authentication, you'll need to provide the (1) User's full name or system name and (2) the PKCS file password (this should be a strong password) at a minimum though you can fill out the form in it's entirety if you choose.
Once you're done, click Save to generate the certificate and create the account.
Download Certificate Files
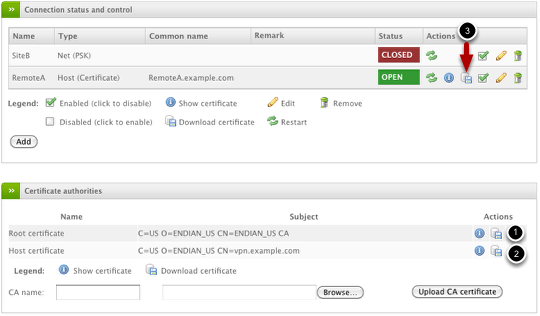
You'll need to download the certificates for use on the client software. You will need (1) the Root certificate, (2) the Host certificate, and (3) the client account certificate (PKCS).
Configure Shrewsoft Client Software
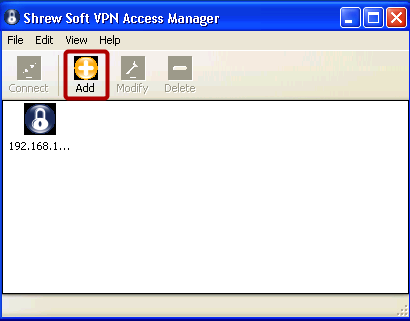
Once you've downloaded and installed the client software, launch the ShrewSoft VPN Access Manager.
Select Add to create a new connection.
Configure Shrewsoft Client - General Tab
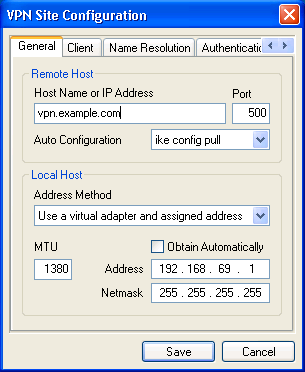
Under General tab, we'll enter the VPN Server IP or Hostname with default settings. Under Local Host, select "Use a virtual adapter and assigned address" and be sure to uncheck the "Obtain automatically". In the Address / Netmask fields you should use a subnet and netmask that is not being used anywhere on your network (so not 192.168.5.0/24 for our example).
Configure Shrewsoft Client - Client Tab
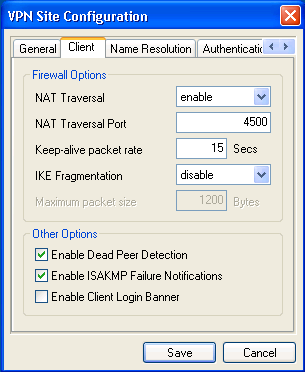
Under Client tab, you can use the default settings (shown above) and be sure that "Enable Dead Peer Detection" and "Enable ISAKMP Failure Notifications" are both checked.
Configure Shrewsoft Client - Name Resolution

Under Name Resolution tab, you may enter WINS and/or DNS servers you would like to use with this specific VPN connection. We'll leave this blank for our example.
Configure Shrewsoft Client - Authentication
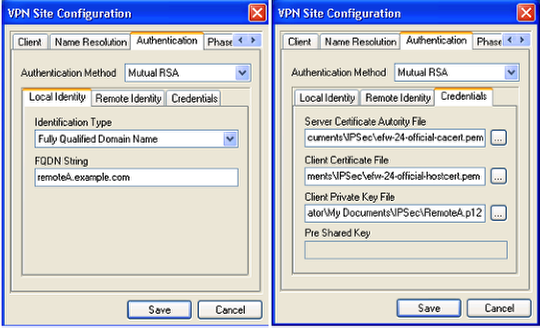
Under Authentication tab, select "Mutual RSA" for the authentication method and then configure the tabs as follows:
- Local Identity tab to use "Fully Qualified Domain Name" and provide the name you entered for the Remote ID field of the Endian VPN Server.
- Remote Identity tab to use "Any"
- Credentials tab is where you will use the certificate files from the Endian VPN Server (Server Certificate = Root, Client Certificate = Host, Client Private Key = Account PKCS Certificate (.p12))
Configure Shrewsoft Client - Phase 1
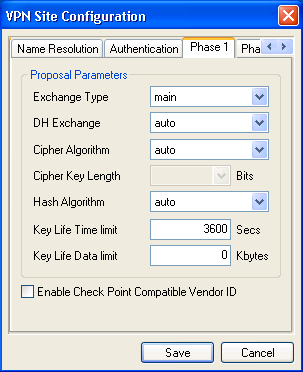
Under Phase 1 tab, use the settings shown above.
Configure Shrewsoft Client - Phase 2
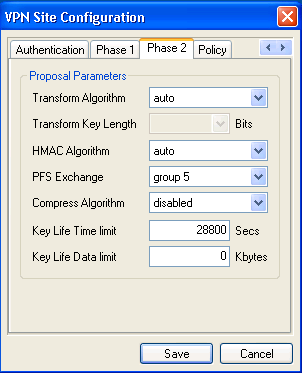
Under Phase 2 tab, use the settings shown above.
Configure Shrewsoft Client - Policy
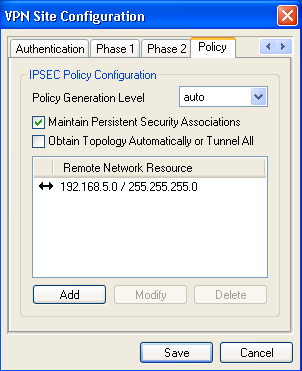
Under Policy tab, make sure that "Maintain Persistent Security Associations" is checked and then be sure to add the Endian Green LAN as the "Remote Network Resource".
Click Save to finish.
Connect using Shrewsoft Client

In the Shrewsoft client, select your newly created connection and click "Connect" and you see a dialog (shown above).
Just select Connect and then you will prompted for your PKCS password in order to complete the connection.
Verify Client Connection
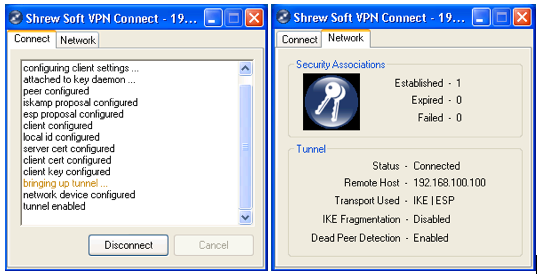
If your connection is established correctly, you should something similar to the above where "tunnel enabled" under the Connect tab and successful connection under the Network tab.
You should now be able to access internal resources on the Endian GREEN network.
Verify Server Connection

On the Endian, you should now see a successful connection with an OPEN status under the client account (shown above).
It's still valid for 2.5 but the screen (media_1310659976383.png) of the VPN Server need to be changed (now there is no VPN on ORANGE) same for "Configure VPN Connection Type" (media_1310661479624.png)
Can this work without static ip addresses? I have gone through this step by step several times without success. The only thing I am not sure about in the walkthru is the function of the local id/remote id. Can you provide some clarity on this?
I am running Endian Community 2.5.1. I have followed these instructions several times, and keep getting "invalid message from gateway" in the Shrewsoft client, and in the endian logs I get INVALID_KEY_INFORMATION.
I am running Endian Community 2.5.1. I have followed these instructions several times, and keep getting "invalid message from gateway" in the Shrewsoft client, and in the endian logs I get INVALID_KEY_INFORMATION.
me too
Is there something to fix ?