Applies to Platform: UTM 2.4, UTM 2.5, 4i Edge 2.5
Last Update: 24th of September 2013
This lesson will illustrate the necessary steps to configure a Roadwarrior SSL VPN (OpenVPN) tunnel between a remote user's computer and an Endian device.
Configuration Example
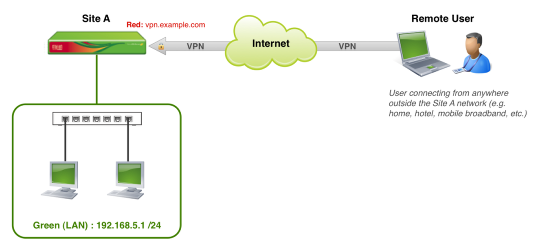
The diagram above is a simple illustration of the configuration example covered in this guide. We'll be creating a remote user (roadwarrior) connection to allow communication between any external remote computer and the internal Site A Green network. This will allow the user to act as though they were locally (direct) connected to the Green network of the Site A Endian device and access the same internal resources.
Enable the VPN Server (Site A)
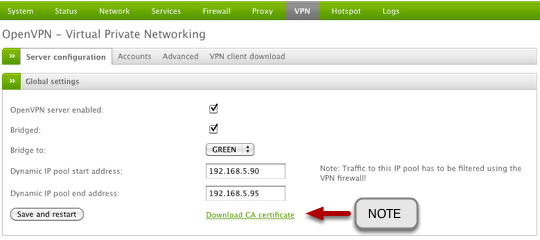
From the Endian main menu, select VPN and immediately you will be taken to the SSL VPN (OpenVPN) server configuration page. The first thing to do is to ensure the OpenVPN server is enabled by checking the first box (1).
The next step is to choose whether you want the OpenVPN server to run in bridged mode (i.e. included in the interface bridge) or you want it to run in non-bridged mode with a separate, unique VPN IP pool. The default is to run in bridged mode (2) to the Green zone and this is recommended for most common VPN deployments. If you choose to run in bridged mode (as we are), you may also specify which network zone you want to be bridged to the VPN interface.
The last thing is to set aside a range of IP's within the bridged interface network to be used exclusively by the VPN server (2). Keep in mind that these IP's shouldn't be allocated anywhere else on the Endian device (e.g. DHCP range, Static IP's , etc.). Once you're done, you can click Save and restart to enable the VPN server.
Note
Create the VPN Account (Site A)

Select Accounts from the VPN Server Menu and then select Add account button to create a new remote user VPN account
Create the VPN Account Details (Site A)
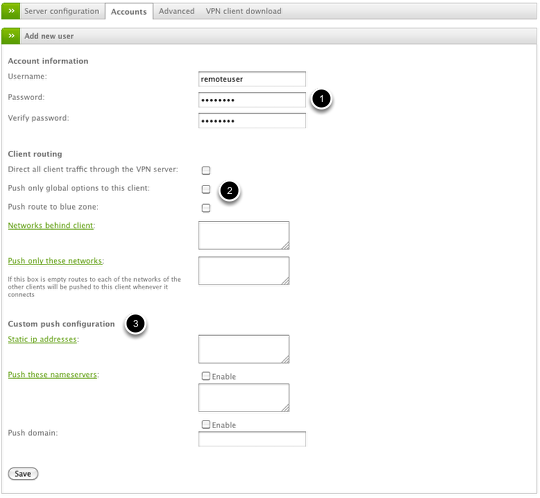
The main things to configure for the new Roadwarrior VPN account are the Username and Password (1).
Some of the other options you can specify include the client routing options (2) where you can determine specifics about routes behind pushed to the remote VPN device as well as some custom push configuration options (3) that allow you to override these settings from the global options [VPN > Advanced]. Remember anything provided here will override the settings you configured for the VPN global options so only use these if this client account requires a different configuration.
Once you've completed the necessary fields, click Save to proceed.
Download the VPN Client Software
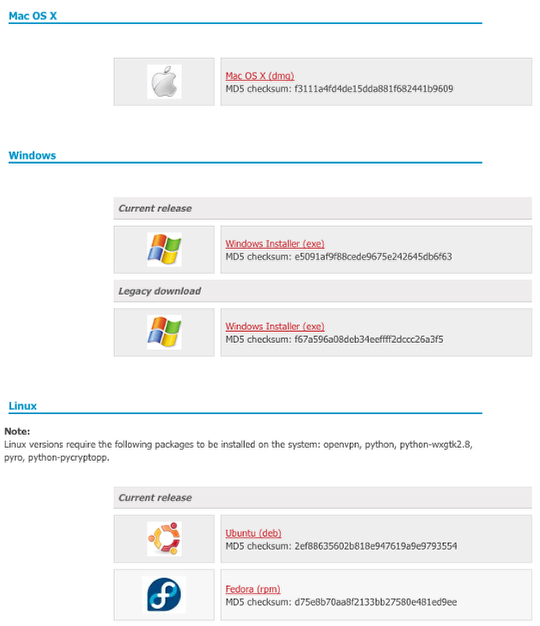
From the Endian main menu, select VPN > VPN client download and then click the link to download the VPN client software. You will be taken (in a new window) to Endian Network where you should already have created your user account. Once logged in you should see the available VPN installer files, at which point you can click the file for your specific operating system -- Windows, Mac OS X, Redhat Linux (.rpm), or Ubuntu Linux (.deb).
https://network.endian.com/downloads.php
Once the download is complete, follow your operating system's normal installation procedure to run the Endian VPN installation package.
Initial VPN Client Configuration
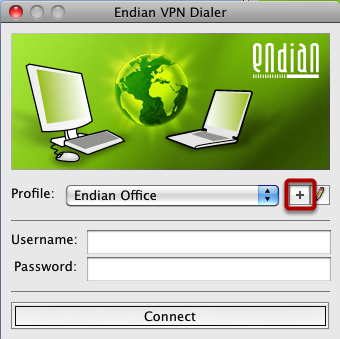
When you open the client the first time you will need to configure the appropriate settings to the client successfully connected. To do this, click the [ + ] icon to add a new VPN account profile.
Configure the VPN Account Settings
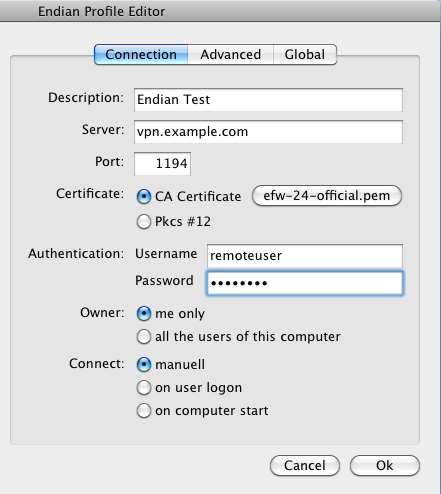
Now all that's left is to configure the VPN account information. For Description, you can provide any brief string to identify the VPN account. Under Server, you need to specify the IP address or fully-qualified DNS name of the VPN server (e.g. vpn.example.com). Next, you must choose the server certificate file you previously downloaded (.cer or .pem). Last, you must provide the VPN account Username and Password you completed earlier.
Warning
Connect to VPN Account
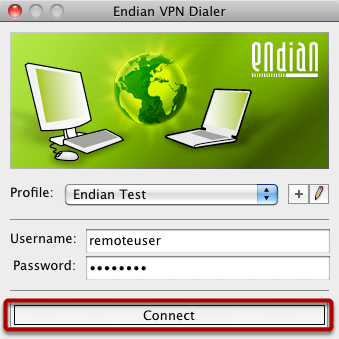
Select the VPN account and click Connect to establish your VPN connection.
Verify Connection
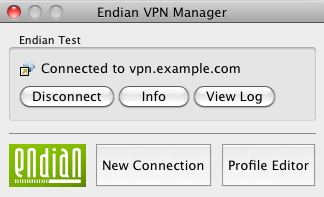
You should a message saying "Connected to <vpn server>" as this indicates a successful VPN connection. You can click the Info button to get basic statistics or click View Log to view the full OpenVPN logs.
You can close the VPN manager at any point and it will remain running. You must click Disconnect to terminate the VPN.
Hello,
I want to assign static ip address to each user, not from pool.
I made record for user:
Static ip addresses: 192.168.0.200/24
but I got ip from pool...
Please help...
Thanks.
...
The Username and Password are saved by default (even after a Windows restart). This may not be a secure practice in some situations. Is there a way to force the Endian VPN Manager to ask for a Username and Password everytime it starts?
I enabled VPN, defined the bridged IP pool of the green zone and defined a vpn user on the server.
Then, on the client I got connected and got assigned the first address of that pool.
My problem is that I cannot ping any host in the green zone.
What am I missing? I guess i am missing some firewall setting. is It?
Thanks
Extraxt from the server VPN log:
OpenVPN
2013-08-30 15:17:11
openvpn[12445]: 190.128.15.164:64401 [u_ram] Peer Connection Initiated with 190.128.15.164:64401 (via xxx.xxx.xxx.xxx)
OpenVPN
2013-08-30 09:30:38
openvpn[8335]: 190.128.15.164:49499 [u_ram] Peer Connection Initiated with 190.128.15.164:49499 (via xxx.xxx.xxx.xxx)
Is it possible to use the standard OpenVPN client? I have been testing using the Android OpenVPN client with the config bellow. The connection is made and authenticated; traffic is being sent from the android device but nothing is being received. Is this an issue with the Android implementation or a restriction of the OpenVPN implementation on the Endian UTM Software Appliance 2.5 Base?
Enables connection to GUI
management /data/data/de.blinkt.openvpn/cache/mgmtsocket unix management-client management-query-passwords management-hold
setenv IV_OPENVPN_GUI_VERSION "de.blinkt.openvpn 0.5.46"
Log window is better readable this way suppress-timestamps client verb 1 connect-retry-max 5 connect-retry 5 resolv-retry 60 dev tun remote my.external.server 1194 tcp-client auth-user-pass <ca> Bag Attributes: <No Attributes> subject=/C=IT/O=efw/CN=efw CA issuer=/C=IT/O=efw/CN=efw CA
-----BEGIN CERTIFICATE-----
-----END CERTIFICATE-----
</ca>
comp-lzo
route-ipv6 ::/0
route 0.0.0.0 0.0.0.0
Use system proxy setting
management-query-proxy
Android OpenVPN Log: http://pastebin.com/vxVa3JSY
*** SOLVED *** Standard Android clients use TUN instead of TAP used by Endian. I have found a client that supports TAP simulation and now works fine.
https://play.google.com/store/apps/details?id=it.colucciweb.openvpn (non-free but is working)